Note
Need help? Please let us know in the UMEP Community.
8. DevelopmentGuidelines
8.1. Contributing with python code to the UMEP plugin in QGIS
Here, instructions and recommendations on how to make your own plugin to go with the UMEP plugin will be described as well as tips and tricks on how to make use of the GIS capabilities included in QGIS to go with your plugin.
Gary Sherman (creator of QGIS) has produced a number of useful tools for developers that can be used to make your own contribution to the software. Below, a number of tool are listed that come very handy when you want to create your own plugin. There is also a number of resources online that is very useful. One is the PyQGIS Developer Cookbook available from the QGIS webpage and another is a book written by Gary Sherman called The PyQGIS Programmer’s Guide.
Start off by creating a plugin using the PluginBuilder in QGIS. This is a plugin that sets up all necessary files and folders for your plugin.
Another useful plugin is the PluginReloader which makes it possible to reload a plugin in QGIS without restarting the software.
pb_tool is another useful program to use for installing your plugin in the QGIS plugin folder as well as cleaning etc. Install via pip.
Please use the python libraries that comes with the QGIS installation as much as possible without including external libraries when developing your plugin. All libraries are not included when a common installation of QGIS is installed. Go to our Getting started section for further instructions.
External Python libraries currently included in the UMEP plugin (Utilities folder):
f90nml - for reading and writing of fortran namelists
Pysolar - for calculation of Sun positions
To use the f90nml library located in the Utilities folder:
from ..Utilities import f90nml
If a Python library is not common and not installed, use a try statement to avoid plugin failure:
try:
    import pandas
except Exception, e:
    QMessageBox.critical(None, 'Error', 'The WATCH data download/extract feature requires the pandas package '
                           'to be installed. Please consult the FAQ in the manual for further information')
    pass
8.2. Quick guide to set up a Python IDE on Windows
Here follows an example on how to set up a integrated development environment (IDE) on your Windows 10 machine for UMEP plugin development or general stand alone Python PyQGIS scripting. Prerequisites for these instruction is that you have installed QGIS and UMEP according to our Getting started section for further instructions.
Install VSCode on your system
Next step is to create a .bat-file that will be used to start up VSCode pointing towards the correct Python environment on your computer. Create a new textfile and paste the lines from here. Make sure that the last line in correct, i.e. pointing to the location on your computer where Code.exe is located. Save as “VSCodeQGIS3.bat”.
Start VSCode by executing your new bat-file.
Some initial settings in VSCode need to be performed e.g. installing Python extension. VSCode usually assist you with that by recommending extentions to install (e.g. pylint etc.). Also, make sure that VSCode is pointing to your python.exe -file located in your QGIS installation folder.
Now e.g. try this UMEP tutorial , especially last section to see your Python environment is up to date. If not, post an item in our Discussions page in our code repository and we will try to help you out.
8.3. Other useful information
8.3.1. Upcoming Developments
U/S |
Topic |
Status |
Lead |
|---|---|---|---|
SUEWS |
Snow |
Completed |
Univ Helsinki |
SUEWS |
Convective boundary layer development |
Completed |
Göteborg Univ |
SUEWS |
Storage Heat flux - ESTM |
Completed |
Göteborg Univ /Reading |
SUEWS |
Storage Heat flux - AnOHM |
Active |
Reading/Tsinghua |
SUEWS |
Anthropogenic Heat fluxes |
Actve |
Reading |
Multi |
Benchmark |
Active |
Reading |
Multi |
Downscaling data *precip intensity |
Active |
AG/ LX |
SUEWS/SOLWEIG |
Radiation coupling |
Active |
Göteborg Univ/Reading |
SOLWEIG |
Anisotrophic radiation |
Completed |
Göteborg Uinv |
URock |
Pedestrian wind model |
Active |
Göteborg Univ |
Urban Weather Generator |
Urban heat island |
Active |
Göteborg Univ |
8.3.2. Benchmarking system
8.3.3. How to setup your development environment on Windows
This section is rather old and might not be working instructions. Use instructions above instead.
8.3.3.1. gfortran with NetBeans
Go to Cygwin and install 64-bit. You need to make sure that you install gfortran, g++, gdb, make and gcc. I am not really sure what is needed so I tend to install too many packages rather that too few. Install in c:\cygwin64
Go to your Environment Variables in advanced system settings in windows and include in your Path:
C:\\cygwin64\\bin;C:\\cygwin64\\usr\\bin;C:\\cygwin64\\usr\\local\\bin;C:\\cygwin64\\lib;C:\\cygwin64\\usr\\lib
Install NetBeans from www.netbeans.org. You only need to download the C/C++ version.
If you don’t have the correct Java, follow the link presented to you and install correct version.
Copy your code to a folder of your choice.
Create a new project (C/C++ from Existing Source) and use you folder as the project folder. Keep all other settings.
You are ready to work.
NOTE: Another nice thing to do is to use gfortran from your cluster on your windows PC. Do the following:
In Netbeans, go to Tools>Options>C/C++ and click Edit next to localhost. Click Add… and write metcl2. Just keep on clicking until you need to give your username and password for the cluster.
Now you should be able to run GNU on the cluster from your Windows PC.
8.3.3.2. Python and VSCode (good alternative)
Go to qgis.org and click on download. Choose the installation for advanced users (64-bit). Choose the advanced desktop installation and make sure that qgis-ltr is included. Keep other default settings. This give you a python installation with everything you need (pretty much). If you are missing python libraries after the installation, you can restart the installation file and add more components.
If you haven’t installed VSCode, visit https://code.visualstudio.com/download.
Create a .bat-file (e.g. VSCodeWithQgis.bat) with the following content (put it in your folder created earlier and edit it so that the paths on line 1 and 5 is correct):
- ::
SET OSGEO4W_ROOT=C:OSGeo4W call %OSGEO4W_ROOT%bino4w_env.bat” rem call py3_env.bat rem call qt5_env.bat path %OSGEO4W_ROOT%appsqgisbin;%PATH% set QGIS_PREFIX_PATH=%OSGEO4W_ROOT:=/%/apps/qgis set GDAL_FILENAME_IS_UTF8=YES rem Set VSI cache to be used as buffer, see #6448 set VSI_CACHE=TRUE set VSI_CACHE_SIZE=1000000 set QT_PLUGIN_PATH=%OSGEO4W_ROOT%appsqgis-devqtplugins;%OSGEO4W_ROOT%appsqt5plugins set PYTHONPATH=%OSGEO4W_ROOT%appsqgispython;%PYTHONPATH% start /d “C:UsersxlinfrAppDataLocalProgramsMicrosoft VS Code" Code.exe
Execute the bat-file.
8.3.3.3. How to make standalone application using Pyinstaller
Add the pip package (see above)
You need to add the path to where pip.exe is located (usually C:\Python37\Scripts\). If you don’t know how to add a path in your environment settings you can temporarily add one in a command prompt by writing:
path %PATH%;C:\Folder_where_pipexecutable_is_located
In the same command prompt, write:
pip install pyinstaller
Locate yourself where you have your script and e.g. write:
pyinstaller suews_wrapper_v3.py
8.3.4. SUEWS Prepare Developer
This is for advanced users regarding SUEWS Prepare plugin in UMEP. The information in should help with translating the plugin, adding new tabs or adding new variables.
- most important files for making changes to the plugin
excel documents SUEWS_init.xlsx, SUEWS_SiteLibrary.xls and SUEWS_SiteSelect.xlsx.
- files are located
as a part of the plugin in the folder named “Input” (by default in C:\Users\your_username\.qgis2\python\plugins\SUEWSPrepare\Input).
- SUEWS Prepare uses these files
for example to generate the amount of site library tabs and the contents of those tabs.
- Take care
any changes made to these documents will be lost if they are replaced (e.g. reinstalling or updating the plugin). This can be prevented by making backups of the excel documents before reinstalling or updating.
- SUEWS_init.xlsx
This file handles the amount of site library tabs in the plugin, the name of these tabs and their connection to other excel sheets and text documents. Each sheet represents one tab.
- SUEWS_SiteLibrary.xls
This file contains all the different information connected to different site. Each excel sheet is connected to a different kind of information like vegetation and water data and each line in a sheet represents a different area or site. This information is used to determine what kind of information and variable will be present in a widget of a site library tab.
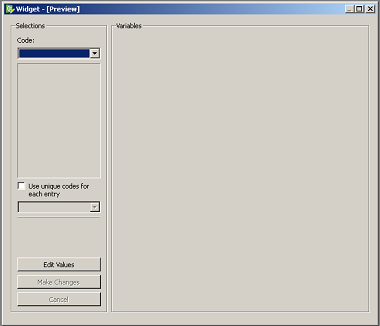
Fig. 8.1 Empty widget not connected to any sheet from the SUEWS_SiteLibrary document.
8.3.4.1. SUEWS_SiteSelect.xlsx
- A detailed look at the SUEWS_init document
This file contains an example of one line of output from the plugin. It is used by the plugin to check the order of the outputs. It can be considered the least important and useful for developers.
- Modifying the plugin
How to work with the excel documents to make changes to existing information inside the plugin such as titles. This could be required for translation or to fix spelling errors.
- Changes available through SUEWS_init.xlsx
The SUEWS_init determines the number of site library tabs as well as the number of widgets in these tabs and where the widgets will fetch their content. The document contains a number of sheets and every sheet represents one site library tab. The names of the sheets will determine the title of the site library tab. The first one is an example of how the layout of a working sheet should look.

Fig. 8.2 Example of the layout of a sheet in the SUEWS_init document.
Each row of a sheet represents a new widget. Every column of the row is used to determine the specific characteristics of the widget.
1 |
The content of a widget such as variables are determined by a sheet from the document SUEWS_SiteLibrary (See #XLS). The first column of a row in a sheet in SUEWS_init makes the connection between a widget and a sheet in SUEWS_SiteLibrary. This means that the content of the first column will be the name of a sheet in SUEWS_SiteLibrary. |
2 |
As well as being connected to a sheet in SUEWS_SiteLibrary each tab needs to be connected to a text document. This text document will basically be a copy of the site library sheet and will be part of the plugin output. All available text documents are located in the folder named “Output” in the plugin directory and will have the same name as the sheets in SUEWS_SiteLibrary. The contents of the second column will be the full name of a text document including the file extension, for example “SUEWS_Veg.txt”. |
3 |
determines the title of the widget’s variable box. |
4 |
optional and determines if there is an identification code for the widget. The identification code is an integer number is used when multiple widgets share a site library sheet but shouldn’t share the same site entries. If an identification code is added the widget will only fetch site entries that match the code. If no identification code is need the column is left blank. |
5 |
determines if there is a default site entry that should be selected in the widget’s drop down menu when the plugin is initiated. If the site code of a site entry (see #XLS) is added to the fifth column this site entry will be automatically selected in the widget on plugin start up. |
6 |
When the plugin generates an output each widget will provide the selected site code in the widget as part of the output. The sixth column is the index of the site code in the plugin output. It should not be changed without careful consideration as there is a risk of the site code overwriting other information in the output if it is. |
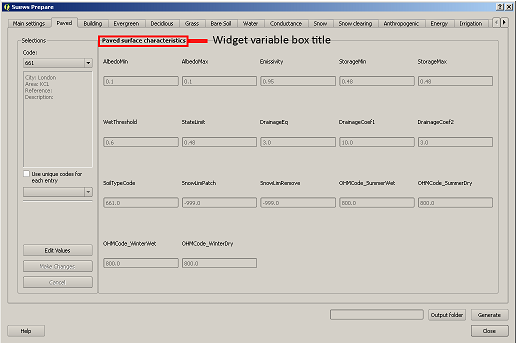
Fig. 8.3 Red outline illustrates the title for the widget variable box.
- Change the variables in the variable box of a widget
The content of a widget is decided by what sheet in the document SUEWS_SiteLibrary.xls it is connected to. This connection is created by the information in the first column of a sheet in SUEWS_init. To make changes edit the text in the first column to match the name of the sheet you want to fetch information from. Example: Let’s say for the purposes of this example that we want the content of the tab named “Paved” to have the same content of the tab named “Evergreen”. To do this we must change the connection in the paved sheet of SUEWS_init to match that of the evergreen sheet. In the evergreen sheet we can see it’s connected to a sheet in SUEWS_SiteLibrary called SUEWS_Veg. If we change the text of the first column in the paved sheet to match this, the content of the tab will change to the same as the evergreen tab.
`PICTURE? this needs attention`
2 |
is like the first a kind of connection but instead of a sheet it’s to a text document. The text file is close to a copy of the sheet a tab is connected to. If the sheet connection is changed the text file connection should be changed as well. Example: If we did the changes to the paved tab in the example above. In the current state of the paved sheet any changes (for example adding a new site) made would write to the wrong text file. Therefore we also need to change the second column to match the correct text file. In this case to “SUEWS_Veg.txt” |
Change the title of the variable box in the widget
3 |
title of the variable box in the widget. “Variable box” is referring to the box on the right hand side of the widget that contains the variables from the site library. If the title needs to be changed simply edit the text in the third column of the correct sheet and the new title of the box will match that. Example: Following the above examples, the title “Building surface characteristics” no longer matches the content of the variable box in the paved tab. Replace the text in the third column to “Vegetation surface characteristics” and our title will now make more sense. |
- Change the default parameters for a widget
fourth and fifth columns are optional information and decide if there are any default parameters for a widget. The number in the fourth column decides if there is an identification code for the tab. This identification code is used to exclude entries from the site library. Many tabs might link to the same site library sheet and if there is an identification code only the entries that match the code will be shown in the widget. If there is a number in the fifth column the tab will try to match this number against the site codes (not to be confused with the identification code). The side codes are the codes that fill out the drop down box in the widget marked “code” and each code represent one site library entry. If there exist a default site code for a tab this code will be selected in the drop down menu on the plugin start up. Example: Let’s keep making changes to the paved sheet. Right now the identification code for the sheet is “1” and the default site code is “661”. If we change the identification code (fourth column) to “4” a different set of site entries will be available for selection in the widget. One of the site codes that are now available is “662”. By changing the content of the fifth tab to “662” this will now be the default site code for the widget.
`PICTURE? this needs attention`
Change the order of the widget site code in the final output of the plugin
A widget’s contribution to the final output of the plugin will be the selected site code in the widget. This code will be placed somewhere on a predetermined place in a long list of variables. The sixth column in a SUEWS_init sheet represents this position in the final output. To change a widget’s output order edit the number in the sixth column. Take care to make sure changing the position doesn’t overwrite any other information. The order of the final output is also closely tied to the document SUEWS_SiteSelect, see more [[#XLSX].
- Editing a tab name
The name of the tabs in the SUEWS Prepare main window correspond to the names of the sheets in the excel document SUEWS_init. To edit a tab name simply change the name of the sheet.
Example: After all the changes made to the paved sheet in SUEWS_init the name “paved” as a description of the tab no longer fit. By renaming the sheet to “vegetation” the tab will have a more fitting name.
`this needs attention PICTURE?`
- Changes available through SUEWS_SiteLibrary.xls
What can be made through the SUEWS_SiteLibrary.xls.
The SUEWS_SiteLibrary document is what defines the variables inside a tab. This document defines the titles and tooltips for the variables as well as the values for the variables on different sites.
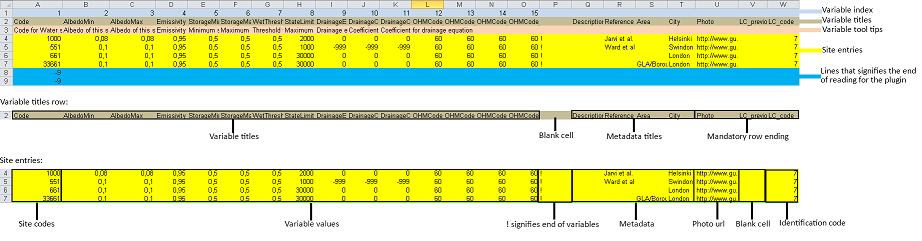
Fig. 8.4 Different rows of a site library sheet highlighted with different color. For the variable title row and the site entry rows the different purposes of the columns have been illustrated.
- Variable index
first row of a site library sheet is an index of the variables in the sheet.
- Variable and metadata titles
second row contains the titles of the variables. The first cell is always the title “Code”. After all the variable titles follows a blank cell. The cells that follows will be titles for metadata, it is also possible that there is no metadata for the sheet. The row always end with the titles “Photo”, “LC_previous” and “LC_code” in that order.
- Variable tooltips
third row contains tooltips or longer descriptions of the variable titles.
- Site entries
A site entry represents one complete set of values for all the variables in the sheet. One row represents one site entry. The first cell of a site entry always contains the site code. This code is used to differentiate between different site entries and needs to be a unique integer number for the sheet. The following cells contain values for different variables until an exclamation mark marks the end of variables. If there are any metadata descriptions these will be in the cells following the exclamation mark. The last three cells are in order: a photo url if there is one otherwise the cell is left blank, a blank cell and lastly the identification code if there is one (otherwise the cell is left blank). The two last rows: The two last rows of the sheet contains a single “ -9” in the first cell. These rows are used by the plugin to signify the end of the data in the sheet and nothing below these rows will be read.
- Change the title of a variable
To change the title of a variable, first navigate to the correct sheet in SUEWS_SiteLibrary. The titles of all variables are decided by the text in the second row. Replace the text in a column to change the name of a single variable or for example translation purposes replace every word in the second row with its translation.
- Change the tooltip of a variable
- The tooltip of a variable is a longer description than the title that shows up when the user hovers over the variable text box.
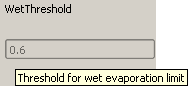
Fig. 8.5 Tooltip of a variable.
The third row of a SUEWS_SiteLibrary sheet defines the tooltip of a variable. To changes it, replace the text for the relevant column in the third row.
- Changes available through SUEWS_SiteSelect.xlsx
The document SUEWS_SiteSelect.xlsx is mainly connected to the final output of the plugin. Most developers won’t need to make any changes to it. Developers mainly concerned with the layout of the SUEWS Prepare plugin will not need to be concerned about SUEWS_SiteSelect.
- Change the order of the final output
The second row of the sheet SUEWS_SiteSelect contains text strings that are used by the plugin to identify a variables place in the final output of the plugin. Changing the order of the strings in the second row will similarly affect the final output.
8.3.4.2. Adding to the plugin
How to make additions to the plugin (e.g. adding new tabs). Earlier information will be useful when adding to the plugin. i.e. read earlier sections before reading this one.
- Adding a new tab to the plugin
As discussed (#XLSX) the excel document SUEWS_init.xlsx is closely tied to how the plugin generates tabs. The plugin will generate tabs according to the number of sheets in this excel document and according to the information in the sheets. A single sheet represents one new tab. Every row in a sheet represents a widget that will be added to the tab. Every column in a sheet contains certain information that decides the specifics for a widget such as what variables will be added. The first sheet of the excel document is an example sheet that can be used as a quick reference for the content of the columns. For a more detailed description see #XLSX.
- To add a new tab to the plugin:
Create a new sheet in the SUEWS_init document. The order of the sheets will match the order of the tabs in the plugin. Do not place the sheet first in the excel document as this is used as a placeholder for the example sheet. The name of the sheet will become the title of the tab.
Add the name of a sheet from the SUEWS_SiteLibrary document to the first column. This will be what decides the content of the first widget in the tab. See #ADD if there is a need to create a new sheet for the tab.
Add the name of a text file that will receive the output of the widget to the second column. In most cases the text file should have the same name as the sheet from step two. Make sure to add the file extension, for example .txt, to the second column as well.
Add a title for the widget in the third column. This title should describe what the variables in the widget represent, for example “Paved surface characteristics”. *
The content of the fourth column is optional. This column contains a code that can be used if multiple tabs share a sheet from SUEWS_SiteLibrary. The code is used to identify what site entries belong to which tab and widget. (See #XLS) Leave the column empty if no identification code is needed.
The content of the fifth column is optional. This column can be used if there is a site entry in the sheet from step two that should be selected in the widget’s drop down menu by default. Enter the site code of a site entry in the fifth column to make it the default. Note that the site code is not the same as an identification code (See #XLS). Leave the column empty if there is no default site.
The sixth column represents the index of the widget output in the order of the plugins final output. The widget output will be the site code selected in the drop down menu. Make sure that the index doesn’t overwrite an already existing output. The easiest way to make sure of this is to check the document SUEWS_SiteSelect for the index of the last variable and use the index after the last variable.
To add more widgets to the tab, follow the instructions from step 2 and forward again on the following rows of the sheet.
- <div id=”ADD” Adding a new set of site variables to the plugin</div>
As discussed in #XLS the variables of a site (and consequently the variables that appear in a widget connected to this site) are generated from the excel document SUEWS_SiteLibrary. One sheet represents the variables of a type of site and can be connected to multiple widgets and tabs. A new site sheet must fulfil certain conditions. The first row of the sheet should be an index of the variables in the sheet that ranges from one to the amount of variables. The second row should contain the titles for the variables and the first column should always be “Code”. Furthermore the second row should always end with the titles “Photo”, “LC_previous” and “LC_code” in that order. The third row should contain longer tooltips or descriptions of the variables. The rows following the third row should each represent one site entry. Lastly the sheet should end with two rows that just contains “ -9” in the first column. For a more detailed description see #XLS.
There are two options when adding site entries; it can be done manually directly in the sheet or through the plugin when the sheet has been connected to a widget. (See Section 6.1 and 3.3.2)
When adding a site entry manually certain conditions must be followed:
The first entry should be the site code for the entry. This needs to be an integer unique for the sheet.
The column following the last variable needs to contain an exclamation mark designating the end of the variables.
If there are metadata titles for the sheet the information for these should be entered in the columns following the exclamation mark. Metadata is optional for all site entries.
For the last three mandatory titles; the “Photo” column can contain a url link to a picture representing the site entry. The “LC_previous” column can be left blank. The “LC_code” column can contain an identification code if this is needed for the site entry.
Each new sheet needs a matching text document located in the “Output” directory of the plugin. This text document needs to mimic most of the excel sheet. Instead of columns separating the variables the text document should use tab indents and each line in the text document represents a row in the sheet. The first line of the text document should be an index of the variables. The second line should be the variable titles. The text document should not contain the variable tooltips therefore the site entries should start on the third line of the text document as opposed to the fourth row of the excel sheet. Any site entries added manually to the excel sheet needs to be manually entered to the text document as well. The two last lines of the text document should just contain a single “ -9”. To add a new site library sheet use the methodology above and follow these steps:
Create a new sheet in the excel document SUEWS_SiteLibrary.
If you know how many variables the sheet will contain start numbering the first row of the sheet from 1 in the first column to the amount of variables in the last column. Otherwise fill in this row when all the variable titles have been entered. The numbering should end where an exclamation mark would be entered for a site entry.
Add the variable titles in the second row. Start with “Code” in the first column. Leave a column blank where the exclamation mark for a site entry would be entered. If there are any metadata descriptors relevant for the site add the title for these after the blank column. Examples of this could be “City”, “Area” or “Description”. After adding any metadata descriptors add “Photo”, “LC_previous” and “LC_code” in the last three columns of the row in that order.
Add the tooltips of the variables to the columns in the third row. These should be longer descriptions of what the variable represents.
OPTIONAL: Add any site entries manually to the sheet. Use a new row for each site entry. The other option is to use the plugin to add all the entries. One benefit of using the plugin is that the site entries will be added automatically to the text document as well as the excel sheet.
Add “ -9” to the first column of the two last rows of the excel sheet.
Create a text document in the “Output” directory of the plugin. Name it after the excel sheet if possible.
Make a copy of the variable index in the first row of the sheet as the first line of the text document. Use tab indents as a replacement for columns.
Make a copy of the variable titles in the first row of the sheet as the second line of the text document. Use tab indents as a replacement for columns.
Copy any manually added site entries in the sheet to the text document. Each site entry is a new line in the text document. Use tab indents as a replacement for columns.
End the text document with two lines, both only containing a single “ -9”.